
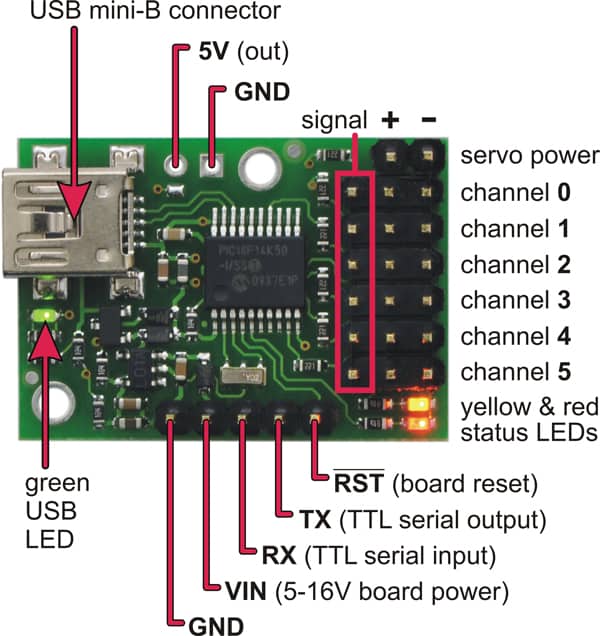
Home automation is a hot topic these days. In this week’s Tech Thursday I will show you how to deploy a simple motion sensor and use it to set the position of a servo. For motion detection I will be using our Mini PIR motion detector module (TE-232-805) as our detector, and an Arduino Uno and a Pololu Maestro6 for our controls. The Pololu Maestro provides a simple and easy way to control multiple servos with basic serial commands.
The motion sensor I’m using can be powered by a 5V source and outputs a 3.3V digital signal when it detects an object. This output is then held high for 9 seconds before it checks again. Even through our Arduino is a 5V microcontroller, the 3.3V output from our sensor is high enough to be detected and won’t cause an issue. One caveat with the sensor is that it has a very wide viewing angle. So if you want to use it as a switch for when someone walks by your desk then you will need to restrict the sensor’s field of view with a little heat shrink around the sensor. I cut about a 3/8″ length of heat shrink and it seemed to give me the sensing area I wanted for this example.
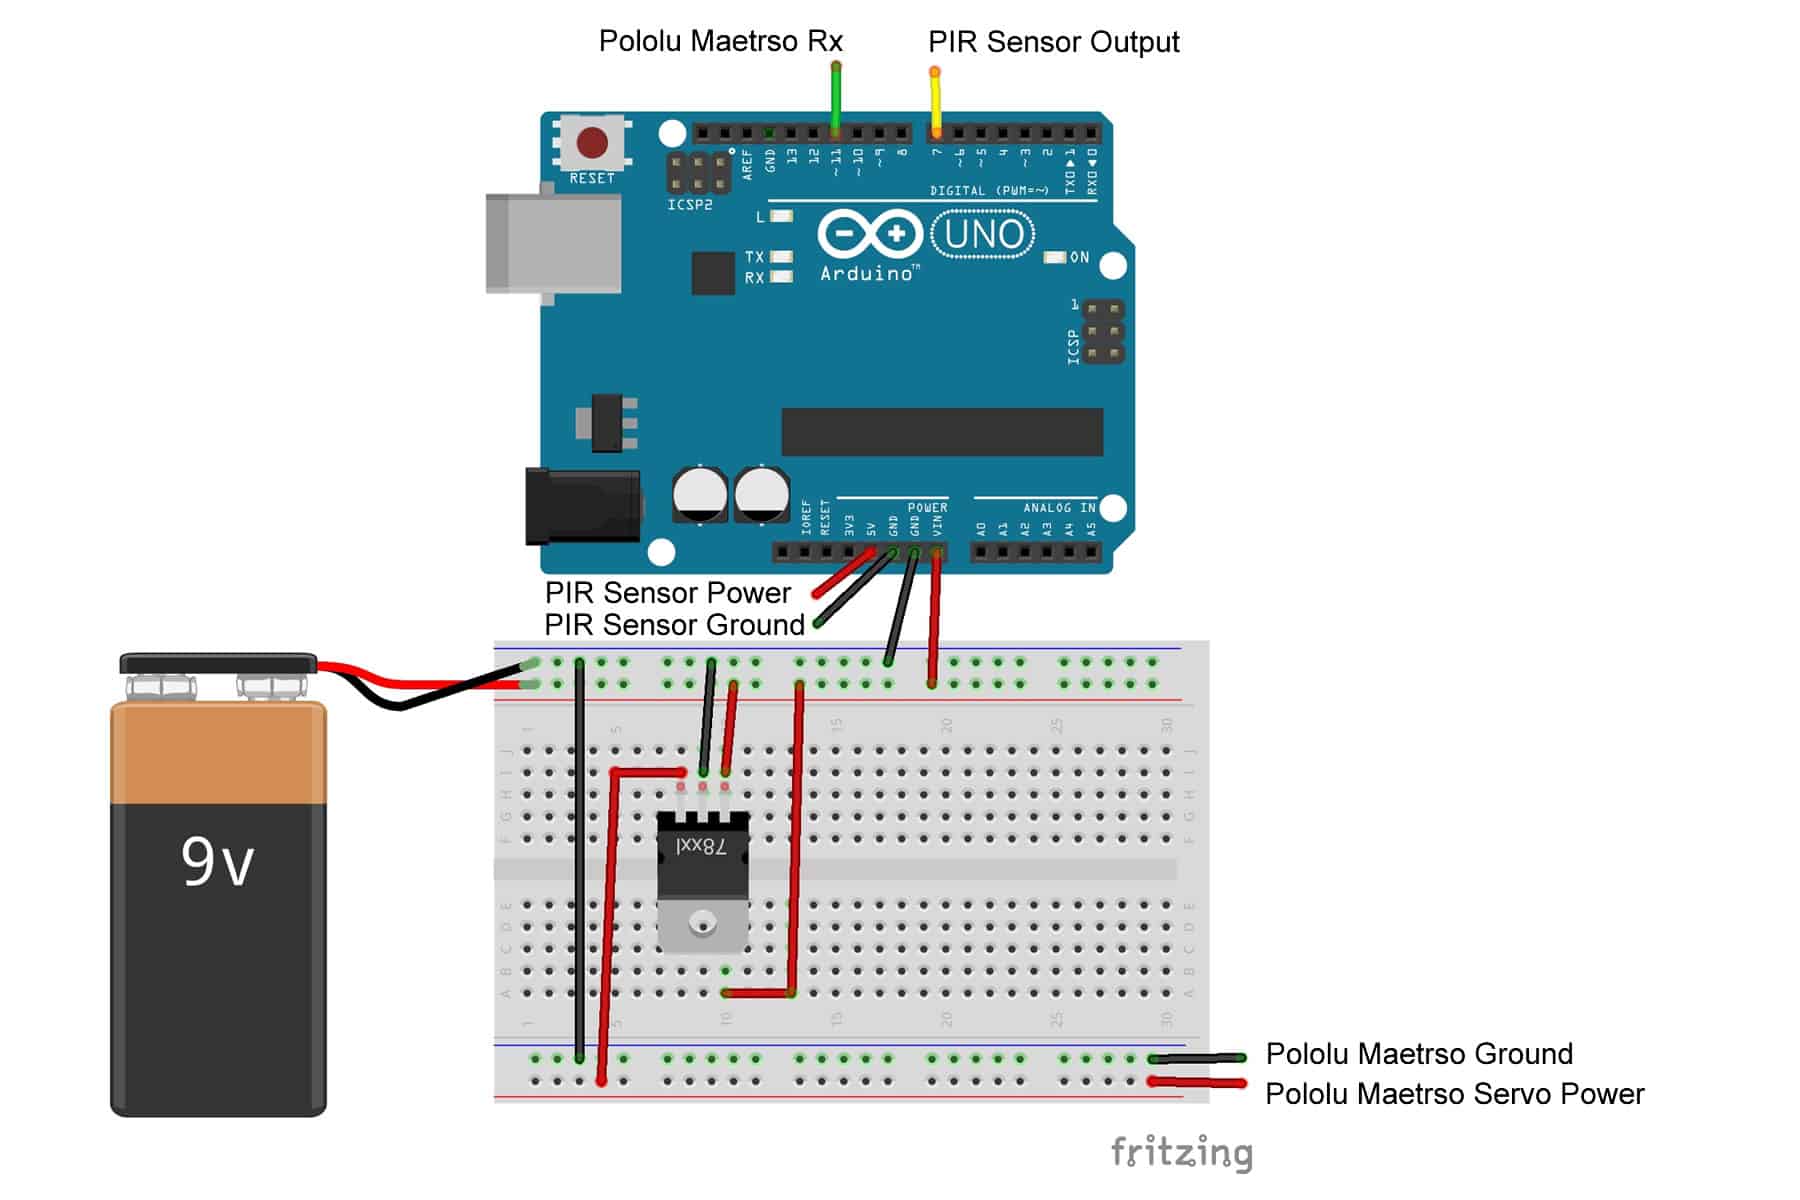
Wiring
For power, I’m using a simple 9V battery as our source and I’m regulating that down for the servos. Although it isn’t shown in the diagram below, it’s a good idea to throw on an electrolytic capacitor on the input and output of the voltage regulator. The PIR sensor is powered by the Arduino with the output wired to digital pin 7. For the COM between the Arduino and the Maestro I’m using a software serial output on pin 11. Since I do not care about information back from the Maestro I only need to wire up the Rx pin.
The Code
Our code below will read in our PIR sensor to pin 7 and command the Pololu Maestro over a software serial port. I’m using the software serial on the Uno so that I can print out some debug information easily through the hardware serial port.
NOTE: The code below assumes that the Maestro has been preconfigured using the USB interface. I’ve set mine to a fixed baud rate of 9600 and I opened up the 8 bit command range to 800.
To control the servo I’m using the Mini SSC protocol found in the Maestro’s user manual. This protocol only requires three bytes of information: a start byte (0xFF), the servo channel, and a position value.
void moveServo(int servoChannel, int targetPosition) {
  byte serialData[3];    // Data buffer to maestro
  int i;                 // Loop counter

  serialData[0] = 0xFF;                   // Start byte
  serialData[1] = servoChannel;           // Target Channel
  serialData[2] = targetPosition;         // Target Position


  // Print out the contents of the data buffer
  for (i = 0; i<sizeof(serialData);i++) {
    servoSerial.write(serialData);
  }
}
The full code implementation.
#include

SoftwareSerial servoSerial(10,11);

int sensor = 7;

void moveServo(int servoChannel, int targetPosition) {
  byte serialData[3];    // Data buffer to maestro
  int i;                 // Loop counter

  serialData[0] = 0xFF;                   // Start byte
  serialData[1] = servoChannel;           // Target Channel
  serialData[2] = targetPosition;         // Target Position


  // Print out the contents of the data buffer
  for (i = 0; i<sizeof(serialData);i++) {
    servoSerial.write(serialData);
  }
  for (i = 0; i<sizeof(serialData);i++) {
    Serial.print("[");
    Serial.print(serialData);
    Serial.print("]");
  }
}

void setup() {

  Serial.begin(9600);          // Debug output
  servoSerial.begin(9600);     // Serial to Maestro

  pinMode(sensor, INPUT);      // PIR Sensor output

  // Let everything boot
  delay(1000); delay(1000); delay(1000); delay(1000);
}

void loop() {

  int sensorState = digitalRead(sensor);
  Serial.print("[Sensor= ");
  Serial.println(sensorState);
  Serial.println("]");

  if (sensorState)
    moveServo(1,1);
  else
    moveServo(1,254);

  delay(100);        // delay in between reads for stability
}

#arduino #techthursday #motion #servo
