Serial communication is a major backbone in embedded electronics and it is exceptionally common to have two embedded devices to talk to one another. For example, you may have one Arduino reading joysticks and sensors and another wired into a robot to command motors, servos, relays, etc. Today’s Tech Thursday will walk you through basic Arduino to Arduino serial communication.
Schematic
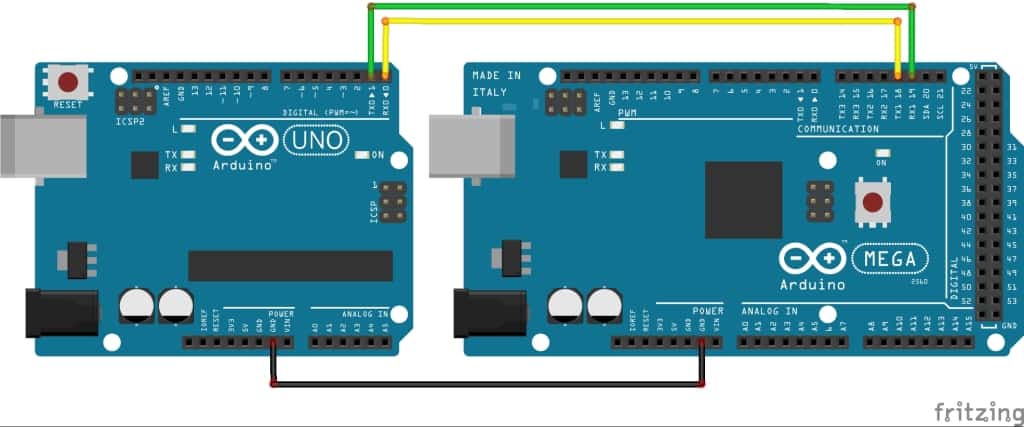
Below is a the general schematic we are going to use for this tutorial. We are using two Arduinos. The Arduino Uno on the left is our sender and the Arduino Mega on the right is our receiver. We’re using the Mega to make it easier to display debug information on the computer. The Arduinos are connected together using digitals 0 and 1 (RX and TX) on the Uno and digital 16 and 17 (RX2 and TX2) on the Mega. The receive on one needs to be connected to the transmit of the other, and vice-versa. The Arduinos also need to have a common reference between the two. This is done by running a ground wire.
The Code
The first step when implementing serial communication is to define your packet. A packet is comprised of some start byte, a payload (the data you wish to send) and a checksum to validate your data. Since this is a basic example, we’re just going to send some counter values.
| Byte | Description |
|---|---|
| 0 | Start Byte (ASCII “S”, or 0x53) |
| 1 | Counter Value |
| 2 | Static Value |
| 3 | Checksum |
Sender Code
The simple sender coder below will increment our counter and send our packet.
// Sender Information
unsigned char START_BYTE = 0x53; // ASCII "S"
unsigned char counterValue = 0;
unsigned char staticValue = 5;
unsigned char checksum = 0;

void setup() {
  Serial.begin(9600);
}

void loop() {

  // Increment our counter
  counterValue = counterValue + 1;

  // Check for overflow, and loop
  if (counterValue > 250)
    counterValue = 0;

  // Calculate our checksum
  checksum = counterValue + staticValue;

  // Important: Serial.write must be used, not print
  Serial.write(START_BYTE);
  Serial.write(counterValue);
  Serial.write(staticValue);
  Serial.write(checksum);

  // We only need to send a packet every 250 ms.
  // If your code starts to get complicated,
  // consider using a timer instead of a delay
  delay(250);
}
Receiver Code
For the receiver code, we’re constantly going through the main loop and looking at whether or not we have information ready to be read. Once we receive our first byte we’ll compare it to our expected start byte. If this passes then we set a flag and wait for the rest of the packet to roll in. Once we have the expected packet then we read the values in, calculate our checksum, and then print out the result into our terminal.
// Sender Information
unsigned char START_BYTE = 0x53; // ASCII "S"
unsigned char counterValue = 0;
unsigned char staticValue = 0;
unsigned char checksum = 0;

// Sync Byte flag
boolean syncByteFound = 0;

void setup() {
  Serial.begin(9600);
  Serial2.begin(9600);
}

void loop() {

  unsigned char rxByte = 0;
  unsigned char calculatedChecksum = 0;

  // Check to see if there's something to read
  if (Serial2.available() > 0 ) {

    // If we're waiting for a new packet, check for the sync byte
    if (syncByteFound == 0) {
      rxByte = Serial2.read();
      if (rxByte == 0x53)
        syncByteFound = 1;
    }

    // If we've found our sync byte, check for expected number of bytes
    if (Serial2.available() > 2) {
      counterValue = Serial2.read();
      staticValue = Serial2.read();
      checksum = Serial2.read();

      calculatedChecksum =  counterValue + staticValue;

      // Print out our serial information to debug
      Serial.print("["); Serial.print("S"); Serial.print("]");
      Serial.print("["); Serial.print(counterValue); Serial.print("]");
      Serial.print("["); Serial.print(staticValue); Serial.print("]");
      Serial.print("["); Serial.print(checksum); Serial.print("]");

      if (calculatedChecksum == checksum)
        Serial.println("[Checksum Passed]");

      else
        Serial.println("[Checksum FAILED]");

      syncByteFound = 0;
    }
  }
}
Variations and Improvements
Another common application for serial communication is when it’s done wirelessly. You can use the same method here, but use two xBee transceivers to provide you a wireless link.
General improvements for the handling of the packets can include handling of multiple packet types and the usage of buffers. For multiple packet types, you will typically have two additional bytes after the sync byte. The first is to declare the type of packet and the second is to declare the size of the packet. The packet type is needed in case you will be talking to multiple devices or sending specific commands. The packet size is needed in case the Arduino reading it does not know what that specific packet type is. It’ll just read to completion and ignore it.
For organizing your data, it’s also common to just read everything into a general buffer and when you’ve read the packet to completion, you can copy this buffer into a struct. Structs allow you to handle your data much more elegantly.


