
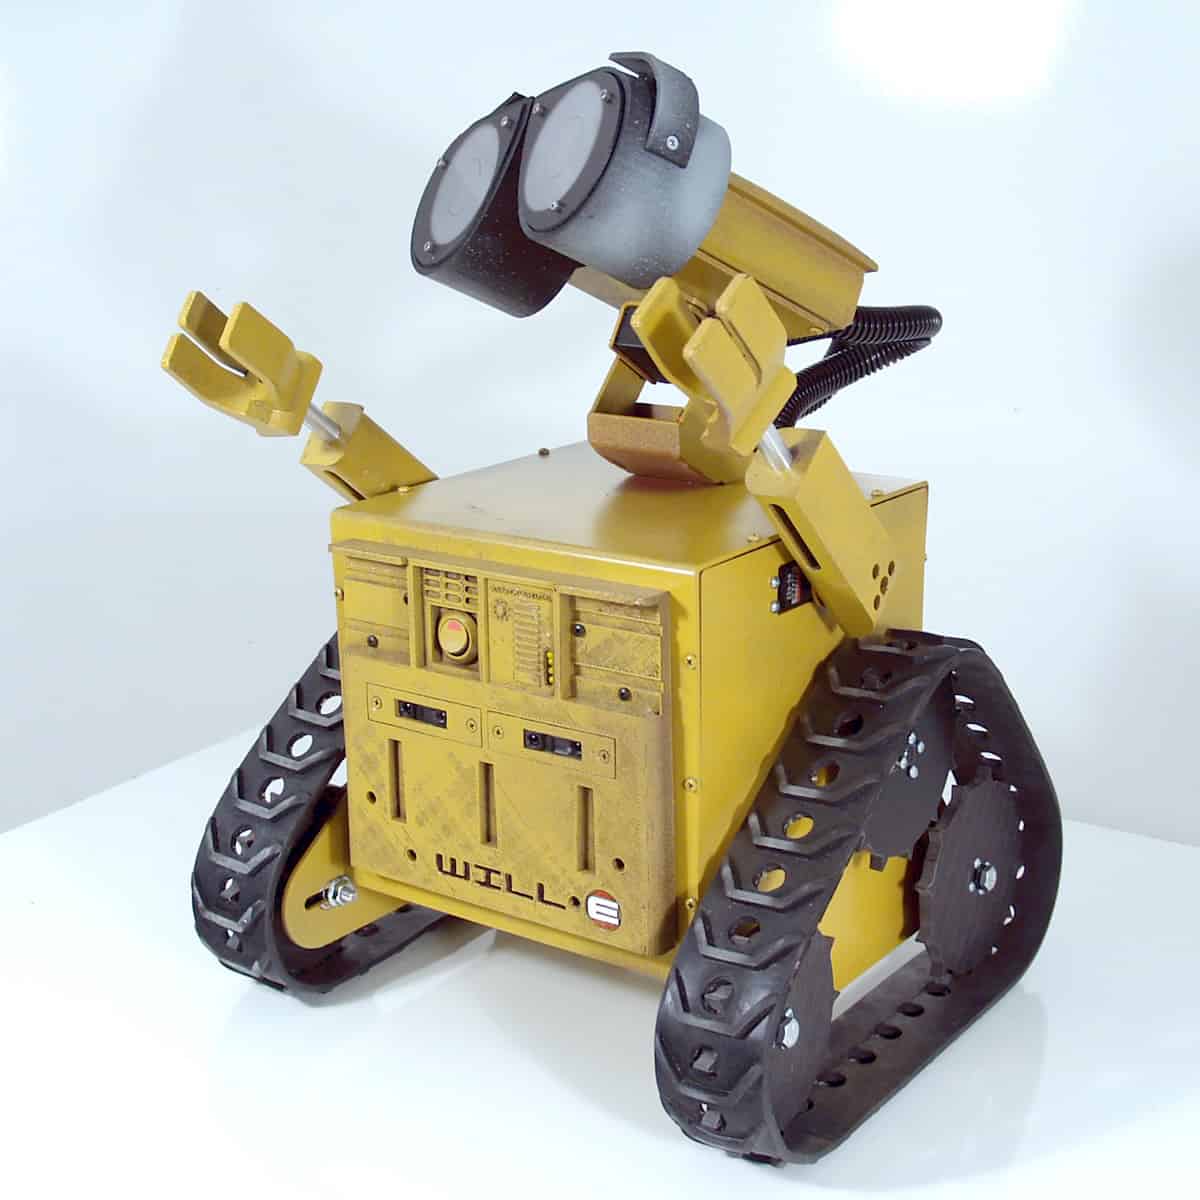
We had fun building this robot. He may look familiar… We started with MLT-JR custom length tracks and added a simple shell and head. The motors are driven with a Sabertooth 2×5 Motor Controller. All the parts (other than the drive train) were made with our 3D printers. Then we gave it a quick paint job. We embedded two IR sensors on the front and put a Arduino in the middle cavity to drive him around and a Pololu 12 channel Maestro to move the servos to control his head, eyes, and arms. Its powered by a 11.1V lithium battery.
Check out the video of Will-E driving around
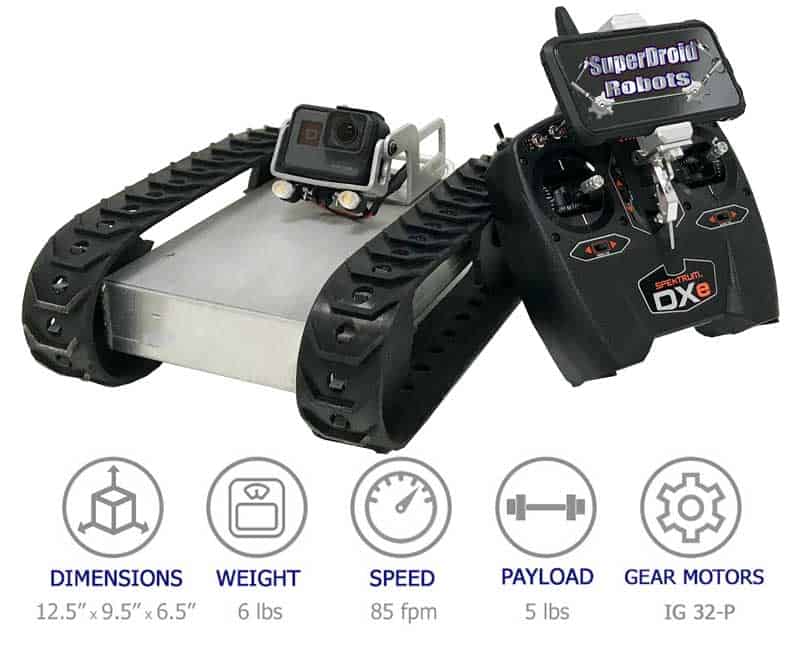
Some Pictures…


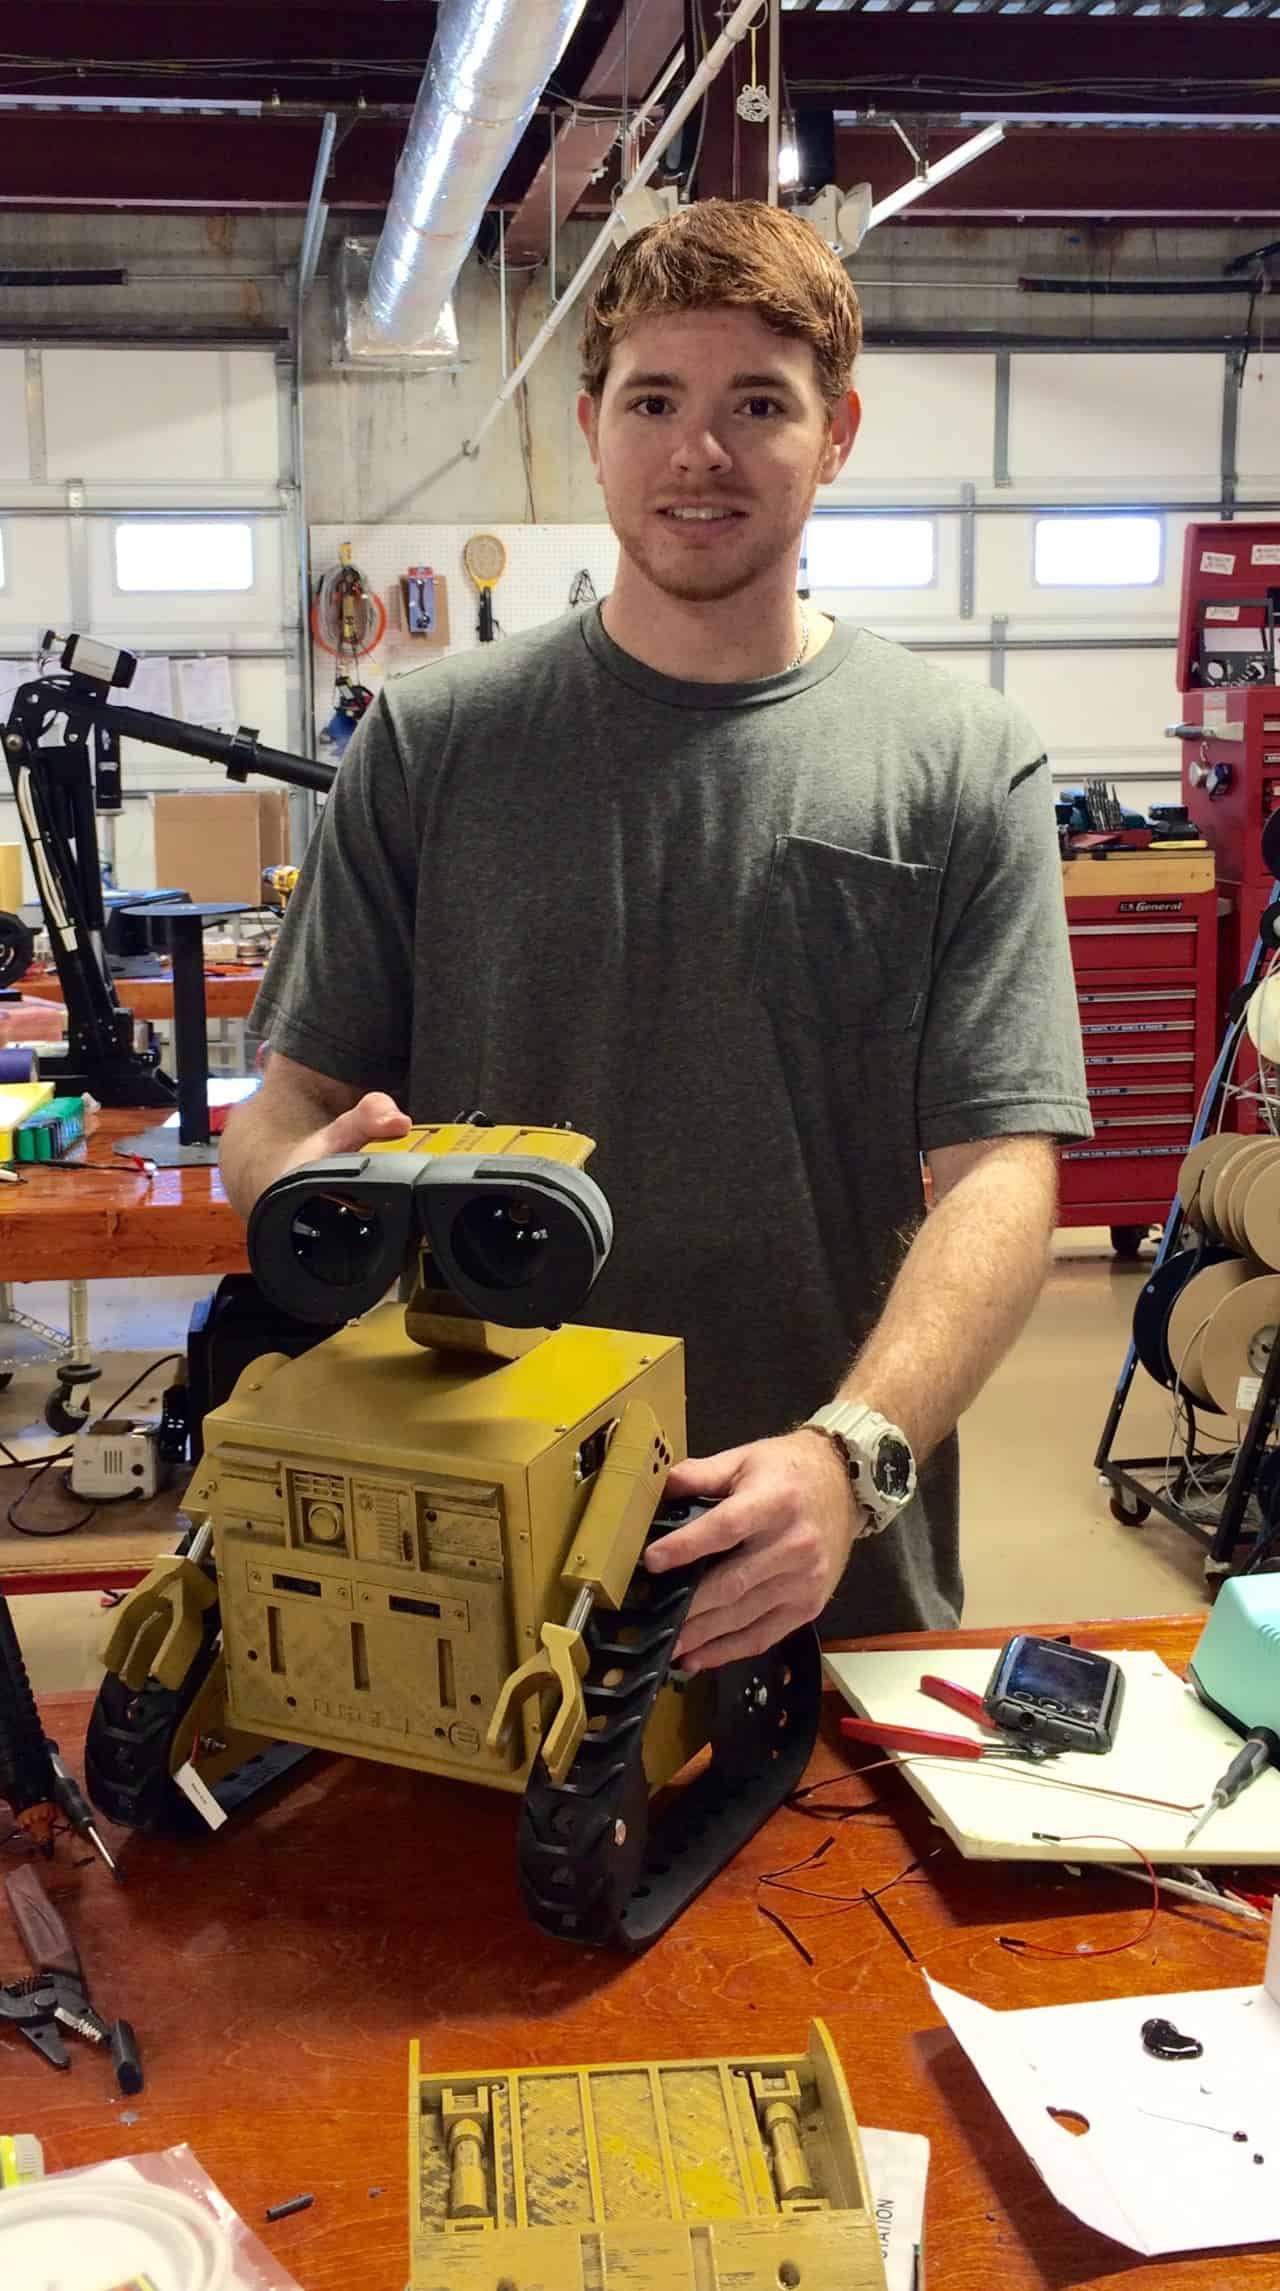
Happy young man playing with his Will-E!
The Arduino Code
// ************************************************************************************** // Name : willie.ino // Author : Jason Traud // Notice : Copyright (c) 2015 SuperDroid Robots // : All Rights Reserved // Date : March 31, 2015 // // Arduino : Arduino Uno R3 // Shield(s) : None // Sensors : 2x Sharp IR Sensors (10cm-80cm) // Motor Controller : Sabertooth 2x5 // // Notes : This firmware runs an automated routine with the Will-E // robot. After the robot wakes up it will demonstrate basic // object avoidance by backing away from the detected object // turning, and trying again. // // ************************************************************************************** // ************************************************************************************** // Pololu Maestro Connections // Servo # | Body Part // 0 | Left Arm // 1 | Right Arm // 2 | Head Pan // 3 | Head Tilt // 4 | Left Eye // 5 | Right Eye // // WARNING: Do not command the left eye servo above 1500 or the right eye servo below // 1500. This is below the closed point and may damage either the servo or // the eye peice. // // ************************************************************************************** // Libraries #include// Used for Maestro and Sabertooth COms //#include // Drive Motor Controller #include // Switched to Simplified Library due to issue with Sabertooth 2x5 #include // Pololu Maestro Servo Controller // Hardware Pins #define SAB_ESTOP 3 // Emergency stop pin on the Sabertooth (not used in simplified mode) #define LED_ONE 13 // LEDs on the robot's chest #define LED_TWO 12 #define LED_THREE 11 #define LED_FOUR 10 // Servo IDs on the Pololu Maestro #define LEFT_ARM 0 #define RIGHT_ARM 1 #define HEAD_PAN 2 #define HEAD_TILT 3 #define LEFT_EYE 4 #define RIGHT_EYE 5 // Servo positions (in quarter microseconds) #define ARM_HORIZON 6000 // 1500 * 4 = 6000 #define LEFT_ARM_UP 8000 // 2000 * 4 = 8000 #define LEFT_ARM_DOWN 5120 // 1280 * 4 = 5120 #define RIGHT_ARM_UP 4000 // 1000 * 4 = 4000 #define RIGHT_ARM_DOWN 3880 // 1720 * 4 = 6880 #define HEAD_CENTER 6000 // 1500 * 4 = 6000 #define HEAD_LEFT 4000 // 1000 * 4 = 4000 #define HEAD_RIGHT 8000 // 2000 * 4 = 8000 #define HEAD_DOWN 6960 // 1740 * 4 = 6960 #define HEAD_UP 4880 // 1220 * 4 = 4880 #define LEFT_EYE_CLOSED 5600 // 1400 * 4 = 5600 #define LEFT_EYE_OPEN 4000 // 1000 * 4 = 4000 #define RIGHT_EYE_CLOSED 6400 // 1600 * 4 = 6000 #define RIGHT_EYE_OPEN 8000 // 2000 * 4 = 8000 // State Machine #define SENSOR_THRESHOLD 200 // Sabertooth Motor Controller (Drive) SoftwareSerial SabSerial = SoftwareSerial(NOT_A_PIN, 2); // Serial Tx is on pin 2, scrap the Rx pin //Sabertooth ST(128, SabSerial); SabertoothSimplified ST(SabSerial); // Maestro SoftwareSerial maestroSerial(5, 4); MiniMaestro maestro(maestroSerial); // ************************************************** // FUNCTION: bootLEDs() // DESCRIPTION: Show power levels coming online... // RETURNS: none // ************************************************** void bootLEDs() { digitalWrite(LED_ONE, HIGH); delay(250); digitalWrite(LED_TWO, HIGH); delay(150); digitalWrite(LED_THREE, HIGH); delay(50); digitalWrite(LED_FOUR, HIGH); } // ************************************************** // FUNCTION: initialPositionServos() // DESCRIPTION: Positions the robot as if it were "asleep" // RETURNS: none // ************************************************** void initialPositionServos() { delay(100); maestro.setTarget(LEFT_ARM, LEFT_ARM_DOWN); delay(100); maestro.setTarget(RIGHT_ARM, RIGHT_ARM_DOWN); delay(100); maestro.setTarget(HEAD_PAN, HEAD_CENTER); delay(100); maestro.setTarget(HEAD_TILT, HEAD_DOWN); delay(100); maestro.setTarget(LEFT_EYE, LEFT_EYE_CLOSED); delay(100); maestro.setTarget(RIGHT_EYE, RIGHT_EYE_CLOSED); delay(100); } // ************************************************** // FUNCTION: homeServos() // DESCRIPTION: Positions the robot to patrol // RETURNS: none // ************************************************** void homeServos() { delay(100); maestro.setTarget(LEFT_ARM, ARM_HORIZON); delay(100); maestro.setTarget(RIGHT_ARM, ARM_HORIZON); delay(100); maestro.setTarget(HEAD_PAN, HEAD_CENTER); delay(100); maestro.setTarget(HEAD_TILT, HEAD_CENTER); delay(100); maestro.setTarget(LEFT_EYE, LEFT_EYE_CLOSED); delay(100); maestro.setTarget(RIGHT_EYE, RIGHT_EYE_CLOSED); delay(100); } // ************************************************** // FUNCTION: flail() // DESCRIPTION: Shows the robot "panicing" // RETURNS: none // ************************************************** void flail() { maestro.setTarget(LEFT_ARM, LEFT_ARM_UP); // Raise arms maestro.setTarget(RIGHT_ARM, RIGHT_ARM_UP); // maestro.setTarget(HEAD_PAN, 7200); // scew head to the right maestro.setTarget(HEAD_TILT, HEAD_UP); // maestro.setTarget(LEFT_EYE, LEFT_EYE_OPEN); // Raise eyebrows maestro.setTarget(RIGHT_EYE, RIGHT_EYE_OPEN); // } // ************************************************** // FUNCTION: bootServos() // DESCRIPTION: Shows the robot "waking up" // RETURNS: none // ************************************************** void bootServos() { // Position Arms maestro.setTarget(LEFT_ARM, ARM_HORIZON); delay(250); maestro.setTarget(RIGHT_ARM, ARM_HORIZON); delay(250); // Raise Head maestro.setTarget(HEAD_PAN, HEAD_CENTER); maestro.setTarget(HEAD_TILT, HEAD_CENTER); delay(350); // Wink maestro.setTarget(LEFT_EYE, LEFT_EYE_OPEN); delay(750); maestro.setTarget(RIGHT_EYE, RIGHT_EYE_OPEN); delay(500); maestro.setTarget(LEFT_EYE, LEFT_EYE_CLOSED); maestro.setTarget(RIGHT_EYE, RIGHT_EYE_CLOSED); delay(250); maestro.setTarget(LEFT_EYE, LEFT_EYE_OPEN); maestro.setTarget(RIGHT_EYE, RIGHT_EYE_OPEN); delay(250); maestro.setTarget(LEFT_EYE, LEFT_EYE_CLOSED); maestro.setTarget(RIGHT_EYE, RIGHT_EYE_CLOSED); delay(250); } // ************************************************** // FUNCTION: setup() // DESCRIPTION: Initial setup rountine. Sets our I/O, serial COMs, and modules // RETURNS: none // ************************************************** void setup() { // Initialize our Serial coms Serial.begin(9600); maestroSerial.begin(9600); SabSerial.begin(2400); //delay(2000); // Moved from packetized to simplified serial //ST.autobaud(); // the sabertooth 2x5 wasn't responding initialPositionServos(); delay(2000); // Let the sabertooth boot-up before we send data ST.drive(0); // Send a stop command to the motor controller ST.turn(0); // Set our I/O pins pinMode(SAB_ESTOP, OUTPUT); pinMode(LED_ONE, OUTPUT); pinMode(LED_TWO, OUTPUT); pinMode(LED_THREE, OUTPUT); pinMode(LED_FOUR, OUTPUT); // Initialize our output pin states digitalWrite(SAB_ESTOP, HIGH); // A high is a release, grounding it stops digitalWrite(LED_ONE, LOW); digitalWrite(LED_TWO, LOW); digitalWrite(LED_THREE, LOW); digitalWrite(LED_FOUR, LOW); bootLEDs(); bootServos(); } // ************************************************** // FUNCTION: loop() // DESCRIPTION: Main program loop // RETURNS: none // ************************************************** void loop() { int power; int sensorValue1; int sensorValue2; int sensorMax; sensorValue1 = analogRead(A0); sensorValue2 = analogRead(A1); sensorMax = max(sensorValue1, sensorValue2); Serial.print("[AN0="); Serial.print(sensorValue1); Serial.print("][AN1="); Serial.print(sensorValue2); Serial.println("]"); // If our reading is above the threshold, back up, flail, and turn if(sensorMax > SENSOR_THRESHOLD) { // Stop and wait ST.motor(1,0); ST.motor(2,0); flail(); delay(500); // Backup ST.motor(1,-127); ST.motor(2,-127); delay(750); // Stop and wait ST.motor(1,0); ST.motor(2,0); delay(250); // Turn ST.motor(1,127); ST.motor(2,-127); delay(1250); // Stop and wait ST.motor(1,0); ST.motor(2,0); delay(250); homeServos(); //delay(250); } // Continue roaming ST.motor(1,100); ST.motor(2,100); delay(500); }
#Arduino, #TechThursday, #CustomRobot, #Sabertooth, #Servo

